
How to connect Excel to Business Central using a user account
A fairly straightforward way to do this is to connect directly from Excel through Power Query and authenticate using a Business Central user account.


We often need to work in Excel with information from Business Central: general ledger entries, customers, vendors, items or any other data available in the ERP.
In this article, we will see how to establish this connection using an account from the BC environment itself. In another article, we will explore an alternative using Client ID + Client Secret, which is particularly useful when we want to avoid making the connection depend on a specific user account.
Publishing information from Business Central
First, we need a web service containing the information we want to query. To do this, we can find or create the Web Services page in Business Central from here:

The address will have a structure similar to this:
https://api.businesscentral.dynamics.com/v2.0/xxxxxxxx-xxxx-xxxx-xxxx-xxxxxxxxxxxx/Production/ODataV4/Company('Mi%20Empresa')/Movimientos_ContabilidadThe easiest approach is to copy the URL directly from Web Services in BC.
The account must belong to the customer
This point matters, especially if we work as Business Central consultants or partners.
The partner accounts consultants normally use to access customer environments no longer work for this type of connection from Excel. We therefore need an account in the customer’s tenant and a Business Central user with the appropriate permissions.
This also matters for security: through OData, the user can only query information they have access to in Business Central.
Creating a blank query in Excel
Once we have the service URL, we open Excel and go to:
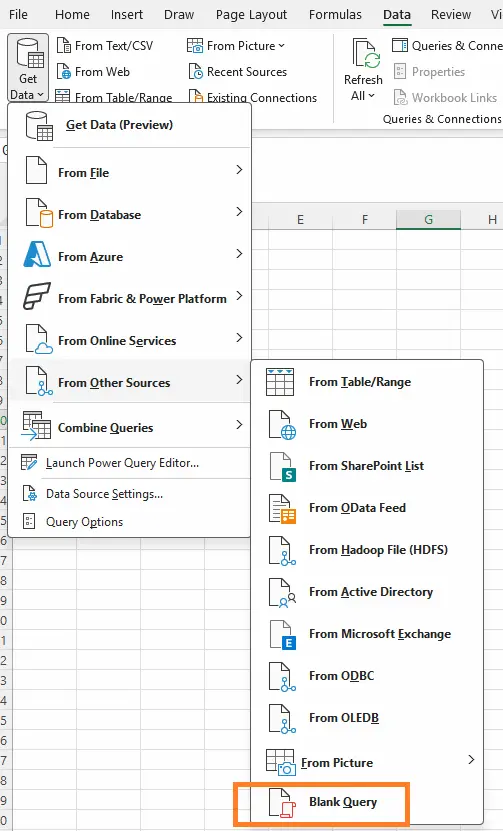
Opening the Advanced Editor
In Power Query, we select Advanced Editor:
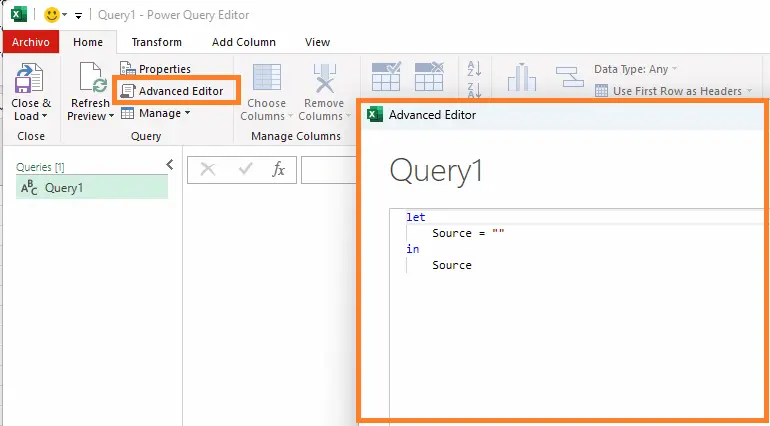
And use something like:
let
    Origen = OData.Feed(
        "https://api.businesscentral.dynamics.com/v2.0/{tenantId}/{entorno}/ODataV4/Company('{empresa}')/{nombreServicio}",
        null,
        [Implementation="2.0"]
    )
in
    Origen
We simply replace the example URL with the OData V4 URL copied earlier from Business Central.
The result will look similar to this:
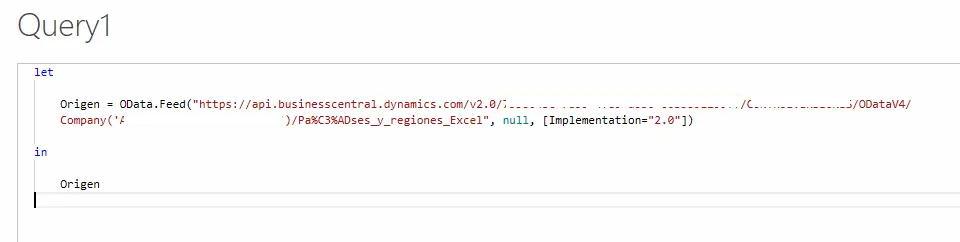
After we confirm the query, Excel will attempt to connect to Business Central.
Signing in with the user account
The first time we connect, Power Query asks how we want to authenticate.
We must select Organizational account.
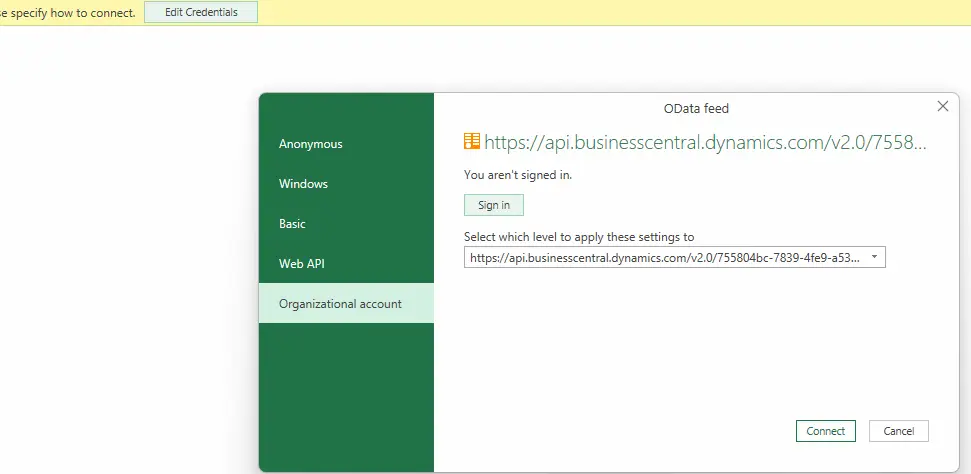
We select Sign in and enter the customer’s account that has access to Business Central.
Once signed in, Power Query can retrieve the data from the OData service.
From this point, we can work with the information like any other Power Query query: remove columns, change data types, combine queries or load the result directly into Excel.
Filtering data directly in the URL
We can also add filters directly to the service URL.
For example, filtering by a particular code:
...?$filter=Country_Region_Code eq 'ES'We can also combine several filters:
...?$filter=Country_Region_Code eq 'ES' and Blocked eq falseWe can filter on fields available in the web service we are querying. In other words, the field must be published in the page or query exposed through OData.
Whenever possible, it is better to filter in the URL
This can make a substantial difference when working with large tables.
Imagine we want to query general ledger entries and have several million records. We could bring all the information into Power Query and then apply a filter:
Movimientos >= 2026But in that case, we may be requesting a huge amount of information from Business Central that we do not actually need. If we apply the filter directly in the URL, Business Central returns only the records that meet that condition.
For example:
...?$filter=Posting_Date ge 2026-01-01This reduces both the amount of data Business Central must return and the work Power Query must perform.
In general, if we know in advance which records we need, it is preferable to apply the filter directly in the URL.
An idea to keep thinking about.
Explore more articles →